Excel to Tally Bulk Entry: Import any Vouchers, Ledgers & Stock Easily
Save hours of manual voucher entry with our professional Excel → Tally import service. Fast, accurate, and compatible with Tally ERP 9 & Tally Prime.
📑 Table of Contents
- 1. Overview: Excel to Tally Import
- 2. Importable Data Types
- 3. Methods to Import Excel Data
- 4. Step-by-Step Process
- 5. Common Errors & Fixes
- 6. Helpful Tools & Add-ons
- 7. Pro Tips to Avoid Errors
- 8. Conclusion

Excel to Tally Bulk Entry Service
Transform your Excel sheets containing vouchers, masters, and inventory items into Tally entries in minutes. Eliminate human errors, increase productivity, and focus more on growing your business rather than manual accounting.
Key Features & Benefits
- ✅ Import vouchers: Sales, Purchase, Payment, Receipt, Journal
- ✅ Import Masters: Ledgers, Inventory Items, Groups
- ✅ Error validation to prevent mistakes
- ✅ Supports Tally ERP 9 & Tally Prime (all versions)
- ✅ Quick turnaround: 24–48 hours for typical volumes
- ✅ Reduce manual work & increase accounting accuracy
- ✅ Compatible with both single and multi-user Tally setups
How It Works
- Share your sample Excel file & Tally version details.
- We map columns, validate data, and create an XML or TDL import file.
- We test the import and provide instructions or perform remote import.
- Receive fully validated Tally data ready to post.
Pricing
Starting at ₹X per 1000 rows, depending on data complexity and validation requirements. Contact us for a personalized quote.
FAQs
Which Excel version is supported?
We accept Excel 2007 and above (.xls, .xlsx formats).
Which Tally versions are supported?
We support Tally ERP 9, Tally Prime, and all versions compatible with TDL add-ons.
Get Started
Send your sample file & requirements → Get a free quote within 24 hours.
Send Sample File or get Update your Excel With Entries which you want To import
 Got to Tally prime Import-Transactions
 Select your File path
 Check Summary of Import and Click on Import

📥 Complete Guide: Excel to Tally Bulk Entry How to upload
If you work in accounting or data entry, manually entering Tally vouchers is time-consuming and prone to errors. This guide shows how to import vouchers, stock items, and masters from Excel to Tally efficiently, saving time while improving accuracy.
📘 1. Overview: Excel to Tally Import
Tally ERP 9 and Tally Prime support bulk data import via XML or CSV formats. Excel sheets can be converted into Tally-compatible XML files and imported using built-in tools or TDL utilities. This process is ideal for businesses dealing with hundreds or thousands of vouchers each month.
Example Use Case: Importing 500+ sales vouchers in just a few clicks instead of manually entering each one.
📂 2. Importable Data Types
| Data Type | Description |
|---|---|
| Masters | Ledger accounts, stock items, units, groups |
| Vouchers | Sales, Purchase, Payment, Receipt, Journal |
| Inventory | Godowns, Batches, Stock Transfer, Delivery Notes |
🛠️ 3. Methods to Import Excel Data
- ✅ XML File Conversion: Convert Excel to XML and import directly into Tally.
- ✅ ODBC Integration: Connect Excel directly with Tally using ODBC drivers for real-time updates.
- ✅ TDL Add-ons: Tools that read Excel data and post to Tally automatically.
Most Used Method: Excel → TDL Tool → Tally (XML) due to speed and accuracy.
📈 4. Step-by-Step Process
Step 1: Prepare Excel File
Format your Excel sheet based on the type of import: Ledger, Voucher, or Inventory.
Ledger Master Format:
| Ledger Name | Group | Opening Balance |
|---|---|---|
| Cash | Cash-in-Hand | 10000 |
| HDFC Bank | Bank Accounts | 50000 |
Sales Voucher Format:
| Date | Party | Item | Qty | Rate | Amount |
|---|---|---|---|---|---|
| 01-04-2024 | ABC Traders | Product A | 5 | 200 | 1000 |
Step 2: Convert Excel to XML
Use VBA macros, TDL utilities, or paid tools like Excel to Tally Importer. Ensure proper column mapping and data validation.
Step 3: Import XML into Tally
- Open Tally (Gateway of Tally).
- Go to Import Data → Vouchers → Specify File Path.
- Select the XML file and press Enter.
- Tally validates and imports the data automatically.
Step 4: Verify Imported Data
Check imported vouchers in Gateway of Tally → Display → Daybook to confirm everything is accurate.
⚠️ 5. Common Errors & Fixes
- ❌ XML tag missing → ✅ Fix: Ensure correct XML formatting
- ❌ Ledger not found → ✅ Fix: Import ledger first
- ❌ Duplicate voucher → ✅ Fix: Use unique voucher numbers
- ❌ Incorrect date format → ✅ Fix: Use DD-MM-YYYY format consistently
- ❌ Empty cells in Excel → ✅ Fix: Fill or remove empty rows/columns
🔧 6. Helpful Tools & Add-ons
- 🔹 Excel-to-Tally XML generators (paid & free)
- 🔹 TDL automation add-ons for repetitive imports
- 🔹 VBA macros to automate data cleanup & formatting
- 🔹 Ready-made templates for ledgers, vouchers, and inventory
💡 7. Pro Tips to Avoid Errors
- Maintain consistent voucher numbers and naming conventions
- Check Excel data for typos, blanks, or incorrect entries
- Use standard date and amount formats
- Test with a small sample file before importing bulk data
- Always backup your Tally company before bulk imports
📌 Conclusion
Excel-to-Tally bulk import drastically reduces manual work, increases accuracy, and saves valuable time. Businesses handling hundreds of vouchers can automate their accounting efficiently.
👇 Comment: If you want a FREE Excel template or XML generator, write "Send Format".
📌 Tags: #TallyTips #ExcelToTally #BulkEntry #TallyPrime #Automation #AccountsEntry #VoucherImport #AccountingAutomation
Import Data Using Sample Excel Files | Predefined Excel Templates
You can easily import data into TallyPrime using predefined Sample Excel Files. These files are readily available for different masters and transactions, and each worksheet is structured to match the corresponding field names in TallyPrime.
Simply export the required Sample Excel File, record your data in the relevant columns, and import it back into TallyPrime.
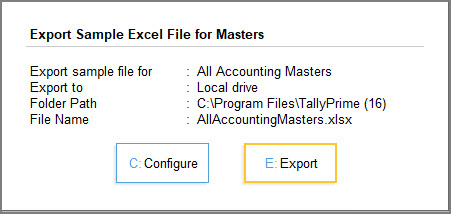
Step 1: Export Sample Excel File
You can export Sample Excel File for masters or transactions depending on your needs. Each sample file includes a set of worksheets, where each worksheet is structured to enter information in-line with the corresponding field names in TallyPrime.
- Press Alt+O (Import) > Manage > Sample Excel File > Masters.
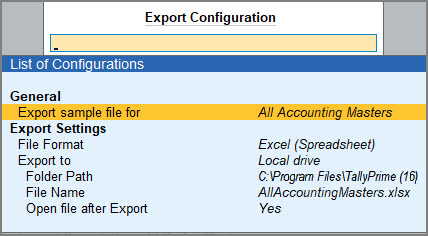
- Press C (Configure) to configure for export.
- Export sample file for: Select the master type for which you want to export the sample file
- Configure the Export Settings: Ensure that the File Format is Excel (Spreadsheet), and specify a suitable file path and name.
You will need to select the same file while importing the data.
- Press E (Export) to export the Sample Excel File.
→ 
Similarly, you can export the Sample Excel File for other masters or transactions depending on your needs.
Step 2: Use the Sample Excel File to Record Data
Before you start entering data in the exported Sample Excel File, click here to know how to use the Sample Excel File. Once you are familiar with the Sample Excel File, record your data as per the required column headers in the Excel file.
Say you are using the Sample Excel File to record ledger details,
- Enter the Name and Group Name in the respective columns, as these are mandatory fields.
- Enter data under other columns as needed for the ledger master and save the Sample Excel File.
Once you have entered all necessary details for ledgers in the Sample Excel File, you can use the same to import the ledger data into TallyPrime.
Step 3: Import Data into TallyPrime
To ensure a smooth and accurate data import, it is recommended that you configure TallyPrime and meet the necessary prerequisites before proceeding.
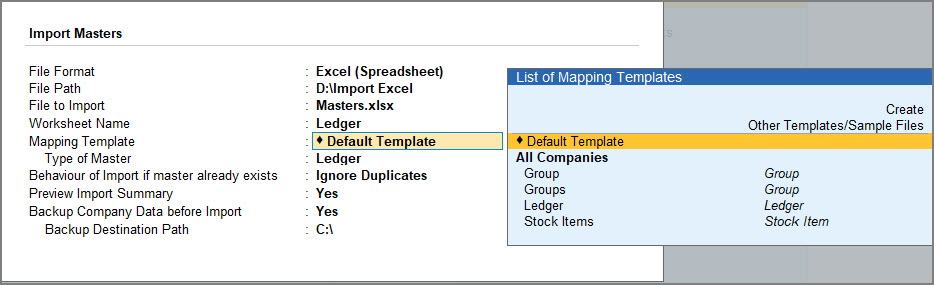
Let’s consider that you need to import the ledger-related data from the Sample Excel File > Worksheet (Ledger).
- Press Alt+O (Import) > select Masters.
- Provide the file details for import.
- Set the File Format as Excel (Spreadsheet).
- Provide details of the Sample Excel File that you had exported and maintained your data in.
- Select the required Mapping Template
- Select Default Template.
TallyPrime provides the template by default for the Sample Excel File. - Select Type of Master as Ledger.
- Select Default Template.
- Configure Behaviour of Import if master already exists, as needed.
- Enable Preview Import Summary to view what will get imported.
- Backup Company Data before Import: Recommended.
- Review the details on the Import Summary screen, if enabled, and press I (Import).
TallyPrime successfully imports your data based on the selected configurations. To ensure data safety, it is recommended to back up your company data before import.
Need sample data? Click here to download.
📌 Important Points Summary
-
Bulk Import Saves Time: Instead of manually entering each voucher or master record into Tally, you can import large volumes of data from Excel, which drastically cuts time and reduces errors.
-
Supported Data Types: You can import different types of data including vouchers (Sales, Purchase, Payment, Receipt, Journal), masters (Ledger accounts, Inventory items, Groups), and inventory details (Godowns, Batches, stock transfers).
-
Multiple Import Methods: Common methods include converting Excel to a Tally‑compatible XML file, using ODBC integration, or employing TDL add‑ons and automation tools. XML conversion is widely used due to its speed and accuracy.
-
Step‑by‑Step Process:
-
Prepare your Excel file with correct columns matching the type of data you want to import (e.g., ledgers, vouchers).
-
Convert Excel to XML using macros, TDL utilities, or converter tools.
-
Import XML into Tally via Gateway of Tally → Import Data → Vouchers/Masters.
-
Verify the imported data in Tally (e.g., Daybook or Master list).
-
-
Common Errors & Fixes: Typical issues include missing XML tags, missing ledgers, incorrect date formats, duplicate entries, and blank cells. These are fixed by ensuring proper formatting and pre‑checking the Excel data.
-
Helpful Tools & Templates: There are tools, macros, and templates available that help automate conversion and simplify mapping between Excel columns and Tally fields.
-
Pro Tips: Use consistent voucher numbering, validate your data before importing, test with a small sample file first, and always backup your Tally data before a bulk import.
Quick takeaway: Importing Excel data into Tally in bulk can transform time‑intensive manual entries into a fast, accurate process — ideal for accountants and businesses handling high transaction volumes.